Photo Viewer – User guide
The Bluewren Photos Suite has many useful features for capturing and classifying images to enable remote monitoring and collaborative work on projects. The Photo Viewer is a key tool in the suite and includes the following elements for appreciation, sharing and fast identification of relevant images taken with the Bluewren Photo Record Tool App.
Photo Viewer Interface

The Photo Viewer layout includes these important items:
- Along the top there is the Photo map name bar showing the name of the current Photo map, the help ? icon and the total number of photos (blue box) and photo groups (green box) in the map database are shown to the left.
Clicking on the ? from any photo map will open this guide in a separate tab.

- Below the Photo map name bar on the left you see the Main menu that includes the Filtering on tags area and Search bar and a listing of all the Photo Groups available in the current Photo map.
- the Filtering on tags area will show the set of tags or sub-tags being used when filtering photo records.
- the Search bar opens a tool that allows a search based on a combination of any or all of three ways:
- the comment that may have been included when the photo was taken
- date range, or
- location (distance from a selected point on the map)
- Photo Groups may be stacked in alphabetical or date order and each group shows the date range of photos within the group.


- The main area of the photo viewer is taken up by the Aerial map:
- this is where all photo icons will be displayed at the location photos were taken via small numbered and coloured icons..
- a small pop-up information window opens when photo icons are clicked that shows the associated image and key information.
- Overlays will display on top of the aerial map in their appropriate position.
- The area just above the Aerial map is the Tag filters and display bar and it includes:
- the Tag filters control – (on the left side) enables view of all tags and sub-tags in the photo map and the number of photos with the relevant tag/sub-tag. Click on a tag/sub-tag will filter all photos to
- the Overlay and Aerial maps controls (in the middle and right side), enable overlays and the aerial map to be toggled on and off or faded to decrease opacity.

- Below the Aerial map is the Timeline bar that shows ticks representing the date the first photo in each Photo group was taken from the first to the most recent group (first photo) arranged across the width of the map.
- On hover over a Photo group in the Main menu ,a bubble showing the number of photos in the group is shown on the Timeline bar. If opened the bubble colour matches the group colour, otherwise it is white
- A coloured dot matching the group colour is included on the Timeline bar for all open groups..
- Hover over a tick on the Timeline bar will show the Photo groups title, date range and number of photos in the group.

Photo Groups
Photo Groups are a collection of photos generally taken on a particular date but may include photos taken over several days. Each photo group includes a title, date or date range, the number of photos included in the group and coloured indicators along the bottom showing the tags classification of photos in the group. There are 10 possible tags and they show in the same spatial position along the bar at the bottom of each group even when particular tags are not included.
- The Main menu on the left lists all of the available Photo Groups in the photo map. A toggle allows for listing by either date order set by oldest photo in the group (most recent group at the top of the stack) or alphabetically (a-z).
- Click on a Photo Group to open it and a numbered list of icons representing each photo in the group will appear. The tag bar also expands and shows the number of photos with each tag in the group.
- Each photo icon in the group has a small coloured indicator that shows the associated tag colour. Each photo has a maximum of two tags.
- When opened the Photo Group bar takes on a unique colour that matches the photo icons that are shown in the map area for ease of cross referencing. This colour is set so that there should not be two open groups with the same colour.
- The Map area shows the position of the photos in the open Photo Group, referenced with the appropriate photo number and tag colour(s).
- As many Photo Groups as desired may be opened simultaneously, and there can, within reason, be an unlimited number of groups in any map.
- The dark blue triangle attached to the photo icon illustrates the angle of view from the location where the photo was taken.


- Clicking on a numbered photo icon, either in the Photo Group or the Map area, will highlight it in the group and change the icon on the map to better show its position in the Map area.
- A white location circle with the yellow fringe indicates the probable level of accuracy on the position of the open photo. This generally varies between +/- 2 to 4m depending on whether the photo was hand located or used the default GPS position when taken.
- A small pop-up information window will also open showing a reduced size version of the image and key information including tag, sub-tag, comment, lat/long, file name and time and date taken. The name of the user that captured the photo record is also shown in red.
- Right click on the image in the pop-up information window will allow save of the smaller sized image as a file or copy for paste into a document or Email.
- Click and hold on the top bar of the pop-up information window allows for movement of the window around the map area. Clicking on the Bluewren icon in the top left of the pop-up shows the photo icon and approximate position the photo was taken on the map.


- Double clicking on a numbered photo icon in the Photo Group or Map area, or on the image in the small pop up information window, will open a separate browser tab with key information on a higher resolution and printable version of the photo. Clicking on the blue box with arrow at the lower right of the pop up information window will also open the higher resolution image.

Overlays and Aerial maps

Overlays are plan drawings shown at the appropriate spatial position relative to the aerial map.
- In the middle of the Tag filters and display bar you see the Overlays control button.
- The Overlays control button indicates the number of overlays available in this photo map.
- Click anywhere on the control button to reveal the detailed list of overlays.
- Clicking the tick box next to the overlay name will toggle it on and off. A many overlays as desired may be displayed concurrently.
- Slide the fader bar to decrease the opacity of the displayed overlays .
- Complex overlays may take a few seconds to load.

It is possible to include high resolution aerial images as the photo map base instead of using the default satellite imagery. High resolution aerial images may be captured by drone or an aircraft flyover. The Aerial Maps control button only functions when high resolution aerial images are loaded into the photo map.
- The Aerial Maps control button is to the right side of the Tag filters and display bar.
- The Aerial Maps control button indicates the number of high resolution aerial maps available in this map.
- Click anywhere on the control button to display the list of aerial maps (if loaded).
- The high resolution aerial map will only be used as the base at closer zoom levels.
- Clicking the tick box will toggle aerial maps on and off. A message will appear on toggle if the zoom level is not sufficient for the high resolution aerial map to display.
- Only one high resolution aerial map can be visible at any time.
- The fader bar allows superimposed viewing of the high resolution map and an open street map.
- High resolution aerial maps may take a few seconds to load.
Tag Filters
The Tag Filters tool is located on the left side above the Aerial map. The tool enables fast filtering of photos to include photo groups with the selected tag or sub-tag.
- Click anywhere on the Tag Filters tool button and all of the tags (maximum 10) used in the map will appear with the number of photos classified into each tag shown in brackets.
- Hovering over a tag will show the sub-tags (maximum 5) and the number of photos classified into each sub-tag is also shown in brackets
- Clicking on either a tag or sub-tag will reduce the number of photo groups in the side menu to only show groups including photos with the selected tag(s) or sub-tag(s).
- The Filtering on tags bar will then show the “on” symbol and a coloured bar that shows the tags / sub-tags being filtered with the number of photos in the selected tag or sub-tag shown to the left.
- Clicking on a coloured tag filter bar will remove that filter, with click of the “x” to the right of the coloured bar removing all filters.
- Also click on any coloured tag icon at the bottom of an open photo group bar to only show photos with this tag. Multiple tags may be selected and will be shown in the Filtering on tags bar. The filter is applied to both open and closed photo groups. Removing filters is the same as above.
- Note that the total number of photos in a tag is not necessarily the addition of all of the sub-tags as photos may be classified to the tag without a sub-tag. The total number of photos in a group may also not add to the total numbers shown in tags as there may be photos with two tags.


Search Tool

When activated the photo groups disappear and will be replaced after each search by photo groups containing photos with data that matches the search criteria.
- comment search – any string of characters may be entered into the enter text search box . Press the start button after entering the desired text or selecting a comment in the used comments (filtered by search) box to commence the search.
- date search – the date range is limited to the oldest and newest photo date available in the map.
- location search – on checking the box a circle will appear in the middle of the aerial map area. This can be dragged to the location you want the search to be centred around and the radius adjusted by dragging the slider to show the desired radius.

A Search may include any or all of the three criteria above as well as tag filters. Tag filters can be applied dynamically to the photo groups included in a search result as per the above filtering methodology.
- The search criteria can be adjusted before hitting the “Again” button, or the criteria removed using the “Reset” button to include fresh input for a new Search.
- To close and end the search click anywhere in the Search bar and the full array of Photo groups will appear.
Additional features and functions
Contact Sheet
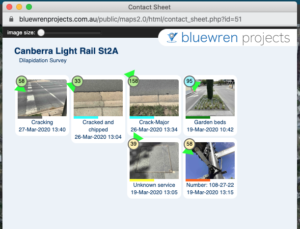
(will not work on touch devices that have no keyboard)
The Contact Sheet window shows all photos you have collected via the special keyboard shortcut of SHIFT & left-click.
- You can adjust the size of the thumbnail with the slider along the top of the Contact Sheet window.
- There is some basic information about each photo.
- Clicking on any of the photo thumbnails will open the printable full resolution version of the photo with additional photo information.
- Closing the Contact Sheet window will reset & clear it’s contents.
Keyboard shortcuts
(will not work on devices that have no keyboard)
- Shift + open run: will close any other open photo groups
- Shift + close run: will close all open photo groups
- Control key: to show only the selected map photo icon
- Shift + double click: adds a photo to a Contact sheet