Editing Tool – User guide
The Editing Tool is used to amend photo records and assocaited information and is accessed through the Bluewren Manager. The key elements in using this Tool are:
- Editing Tool access and interface
- Creating or amending Photo group name and information
- Amending tags, sub-tags and comments
- Amending GPS location and angle of view
- Moving photo records within existing Photo groups
- Adding photos not taken using the PRT App
The following guide describes how to effectively use the Editing Tool and includes example screens from a desktop, we recommend you use a device with a mouse when editing, feel free to use a touch screen if you prefer.
At the end of each guide section you will see a ^ top at the bottom right which will bring you back here, you can then quickly refer to other sections if you need.
Editing Tool access and interface

Access
Access to the Editing Tool is through the Bluewren Manager (available to the administrator and map editors only). After logging in to the Bluewren Manager.
- select the Project and Photo map
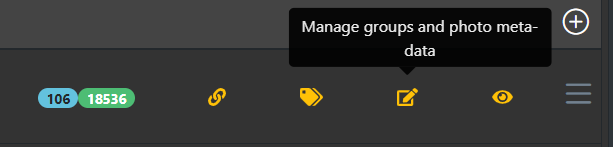
- then click on the Manage photo groups and photo metadata icon
- the Editing Tool will open in a separate tab
For any assistance please feel free to contact us, we would be happy to help get you going…
Interface
The look of the Editing Tool is similar to the Photo Viewer with Photo groups shown in the Main menu on the left hand side of the screen and the Map area that will show the Photo icons and other information.
The main features of the Editing Tool interface are:
- Photo map name bar includes – Edit Photo Map – to differentiate from the Photo Viewer
- The Overlays box will show any uploaded overlays. Uploaded Overlays to appear by default through the Photo Viewer may be switched on and off here. Any Map Overlays switched off by default may be switched on through the Overlays box in the Photo Viewer. The Bluewren Manager is used to upload Map Overlays – information on how to do this is here. Note Overlays cannot be viewed using the Editing Tool
- The Photo groups part of the Main Menu allows for the addition and editing of all of the information associated with the photo records
- Photo groups may be sorted by their title (lowest to highest) or date (newest first) with the date of the last photo taken in a photo group determining the sort order
- The base for the Map area may be toggled between Satellite and Road Map views by clicking on the buttons at the top left of the Map area
- The tool to the left of the Map area may be used for zoom level and movement around the map base. Left double click will also zoom in and left click and hold allows movement of the map base
- Explanation of how to use Photo groups section follows


Creating or amending Photo group title and notes


Save Creating a photo group
The Editing Tool allows for amendment of photo records and also creation of photo groups prior to going in to the field. This may be advantageous if copy and paste of information associated with photo groups is required.
To create a photo group:
- click on the add button in the Photo groups title bar.
- This will open the Add a photo group pop-up and either click in the the custom title bar and a recently typed list will appear to choose from or copy and paste text or type in the title
- Previous titles may also be selected and amended by clicking and selecting from the pull-down menu
- Notes may also be added, these will appear under the photo group name in the viewer and can be used for any additional photo group information.
Click on Save at the bottom right to create the photo group.


Photo viewer with display of
Notes below Photo taken by:
Editing an existing Photo group
To edit photos in an existing Photo group click on the down arrow in a group. This shows all of the photos in the group as well as Photo icons in the Map area similar to the Photo Viewer.
From this point you can:
- Edit any of the photo record information by clicking a photo icon in the main menu area. Hover over the photo icon will show the particular photos location in the map area.
- Click on the green button to add photos taken with other devices – make sure GPS location services are on when taking pictures to ensure location is included. (see here)
- Click on the edit button to amend the Photo group title or notes.
- Also Click on the edit button to move photos to another Photo group. (see here)

Amending tags, sub-tags and comments
Once the relevant Photo group and photo record is selected an Editing pop-up appears in the Map area. This can be moved about by click and hold on the top bar. To add or amend tags and sub-tags to a photo record:
- The tags and comment bar is open by default. If you have already been amending other data click on the bar to open it.
- Click on the drop down bar for the tag and all of the available tags appear for selection. This similarly applies to the sub-tag pull down menu
- Comments may be added or amended by typing directly into the Comment box
- Clicking on Next or Previous at the top of the Editing pop-up or Done at the bottom will save any changes and close the editing pop-up.


Amending GPS location and angle of view
Once the relevant photo record is selected and the Editing pop-up appears in the Map area. This can be moved about by click and hold on the top bar. To amend GPS location and angle of view for a photo record:
- Click on the GPS & angle of view bar to open it.
- Use the buttons at the top of the box to rotate the direction of the angle of view
- To relocate a photo follow the instructions in the box. Holding the SHIFT key will change the cursor to a cross to provide accuracy in repositioning
- The Rotate photo buttons allow for adjustment of view angle to incorrectly oriented photos. 0 is due north
- Clicking on Next or Previous at the top of the Editing pop-up or Done at the bottom will save any changes and close the editing pop-up

Moving photo records within existing Photo groups


Photos that are accidently included in an incorrect Photo group may be easily moved between groups. To do this:
- Select the relevant Photo group photos are to be moved from and then click Edit and the Edit Photo Group pop-up appears.
- Select Move photos and Move photos to another Photo group pop-up will appear.
- Select the destination Photo group from the pull down menu of the same name
- Thambnail size may be changed by using the slider at the top right of the pop-up
- click on the required photo records to be moved
- Click on Perform move and the photo records will be move to the selected Photo group
- Refresh the browser to see the updated information


Adding photos not taken with the PRT App
It is strongly recommended that photos be taken and classified using the PRT App. If this was not possible and other photos need to be stored with a Photo map, they can be…..
Photos not taken with the PRT App may be added to existing Photo groups or included in new Photo groups. GPS must have been enabled and be in the jpeg EXIF data to provide positioning. Note that the photo numbers will be sequenced based on time taken so listing numbers may change depending how the uploaded photos fit into an existing Photo group
- To upload photos click on add and the Upload files into group pop-up appears. The title of the Photo group that the photos to accept the upload is shown at the top of the pop-up box
- In the pop-up box click + Add files and browse to find the required photos or drag and drop the photos into the box to upload. JPEG Files can not be greater than 10MB in size
- When all of the files you wish to upload appear in the box click on Start upload. Be sure to follow the instructions in the box to successfully complete the upload

Photos without GPS data may be uploaded. They will appear positioned at the centre of the Map area and can be repositioned and other classification information included as described above.